Purchase Tom’s Survival Masterclass
By Tom Brown III:
I will start off by saying that we live in the “Camouflage” age. Never before has the average person had access to so many different camo patterns on so many different garments! You can see this for yourself if you go to any hunting store. Not only do we have all the hunting camo, but we also have a variety of military and tactical camo from around the world available to us with a quick trip to the store or a few clicks of the mouse. The problem is that while there are a few gems out there, most of it is useless junk!
Choosing the Right Camo Pattern
When choosing a camo pattern, I want the best pattern to suit the area where I will be using it. The problem is that store-bought camo patterns are very generic and broad, meant to be used in specific types of environments. I can’t walk into my local hunting store and say to the clerk, “I’m looking for a camo pattern that is West side of the Cascade range, early summer, creek bed, from 2-7pm”. The clerk would probably laugh you out of the store!
Honestly, I prefer a solid color, Earth tone garments that match the tones of the land I am hunting over any store-bought camo pattern. If we want to truly camouflage ourselves to WHEREVER we may find ourselves, we need to get creative and get dirty!
The Beauty of Primitive, Natural Camouflage
The beauty of primitive, natural camouflage is it allows us to create extremely effective patterns with simple materials that we gather from the woods around us. Once we have materials, we can literally paint the custom camouflage directly onto our bodies or clothing! It’s as simple as that! For a little while, we will explore the world of primitive camouflage. Later on, we will talk about creating your own custom camouflage on garments of our choosing!
Considerations for Effective Camouflage
Before we start the process of creating the pattern with our materials, we need to stop and think for a second. First off, what is the goal of camouflage? Obviously, it is to hide or obscure our human form and blend into wherever we may be. I would also add that we should be able to move freely. What do I mean by this? Anyone can go into the woods and completely cover themselves with leaves and be hidden, but they will be stuck in that position unless they want to compromise their location. I want to pattern my camo in a way that I can move around to different spots on the landscape and be as hidden as possible. I need to move quietly, and I also want to effectively use a bow, throwing stick, or firearm. If I’m buried in the forest floor, I won’t be able to do these things.
Secondly, I want to take a look at the general area I’m creating my pattern for. What are the colors and patterns I see? What is the terrain like? How is the position of the sun affecting the shadows? Ideally, you are always camouflaged to shadowy areas as it the most universal light pattern. Unless you are out in the wide-open, there will be pools of shadow in different places as the day progresses.
Materials for Camouflage
I mentioned before that we need some materials if we want to create our custom camo patterns. Please keep in mind that you do not need to have all these things to create an effective camo pattern. Often we can get away with just having one of these things. Obviously, the more materials we have, the more detail, depth, and variations we can create. Here is the list.
- Charcoal
- Mud
- Clay
- Loam
- Soil
- Wood ash
Once I have gathered my materials and made my decision as to how I am going to camouflage myself, it’s time to start the process of applying my “makeup”! My first step is to dull myself down. Because most of us are not entirely covered with hair and clean ourselves regularly, we have a shiny complexion. To get rid of the shine, we apply DRY wood ash. We use DRY wood ash because wet wood ash makes lye, giving us a chemical burn. I once had a student who was obviously not paying attention when I spoke of this and immediately went to the fire pit, which was wet because of a recent thunderstorm. He began to smear the paste all over his arms. Needless to say, chemical burns on both your arms are not fun!!! As long as you apply it while it is dry and dusty, it will be fine. Don’t worry about your sweat or rain turning it to lye. If you just dust yourself down, it won’t be concentrated enough to do so. You really want to dust everything down, especially your hair. This will help to absorb light and not reflect it. One of the problems with modern camo clothing is that it is often printed on shiny fabric.
After we are done dulling, it’s time to start creating our camo pattern based on our landscape assessment. For instance, if I am in a young forest with many saplings, I may go with a vertical stripe pattern; if there’s rugged terrain and rocks, I may make my splotches round in shape.
Now I will take my mud and clay and start to apply my overall pattern. One thing about clay that is great is we can change its color and shade by adding soil, charcoal, or any other natural pigments we can find. Back in the pine barrens of New Jersey, where I grew up, you could mix a type of moss with clay to make it green.
I will start with the mud and apply my pattern. In-between the mud, I will use clay and charcoal to accent the main pattern I am using. One thing to keep in mind is that typically mud and clay will be a different shade or color when it dries. It can be a subtle change or very drastic depending on the mud or clay. It’s always a good idea to do a test on your arm to see how it dries. A quick side note about charcoal: you can use it in chunks to apply to your skin, or you can crush it up and apply it that way. You can use the crushed up charcoal to add to mud or clay to change or alter the colors.
You want to be sure to camo everywhere! People always seem to forget the back of their necks, arms, and legs. If the rest of your body is camouflaged, those missed areas will stand out like a sore thumb! Get it everywhere!
After I have applied my pattern all over, I will go back and blend the edges of the different colors to soften the edges. Sharp edges in your camo pattern will be dead give away!
Next, I will collect some leaves, ferns, and a pinecone if I can find them. I will use them as stencils with the mud and clay to fill in the lighter colored areas to add depth and details.
Once I am satisfied with the overall pattern, I will then do what is known as the “final fuzz.” I will take handfuls of debris and press them all over my body. The goal is to get some of the debris to stick to you. This further helps break up the human outline and helps diffuse light. I may even gather a decent sized pile on the ground and gently roll in it. Please keep in mind to not move aggressively because you don’t want to wreck your new look!
After the final fuzz, I am ready to set out on my journey. Moving through the forest this way, especially when combined with good stalking and movement skills, will allow you to blend in and be part of the natural world. The other beautiful thing about this natural camo is it helps control our human odor, which many animals find offensive. During the warmer times of the year, it will protect against biting insects.
If you have camouflaged to sit in a specific spot for a long time, there are several factors to consider when choosing your resting position. How easy is it for me to see what’s going on around me? Can I quickly draw and shoot my bow from this position with minimum movements? If I plan on sitting here all day, how will the sun’s position cast light on this spot throughout the day? It’s also a good idea to bring a little extra charcoal and clay with you for any touch-ups you may need to do. The one drawback with natural camo is it will wear off after a while. There are more permanent solutions with natural camo, such as mixing colors and pigments with rendered fat and applying them to your body. These will not wear off as quick.
As with any skill, the only way to get good at this lost art is to practice! Gather as many different shades of mud and clay as you can. Observe what colors they are when wet and what shade they take on as they dry. I also think it is important to take some cues from nature. Look at creatures that have natural camo. Moths, snakes, lizards, birds, and animals all have camouflage of one sort or another. Even some companies out there are making garments based on critters in nature that have excellent camouflage.
Creating Custom Camouflage Clothing
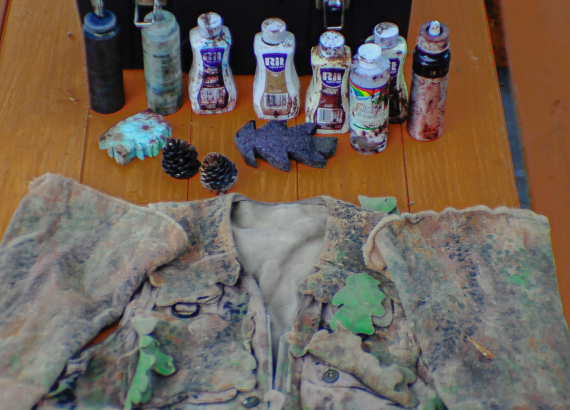
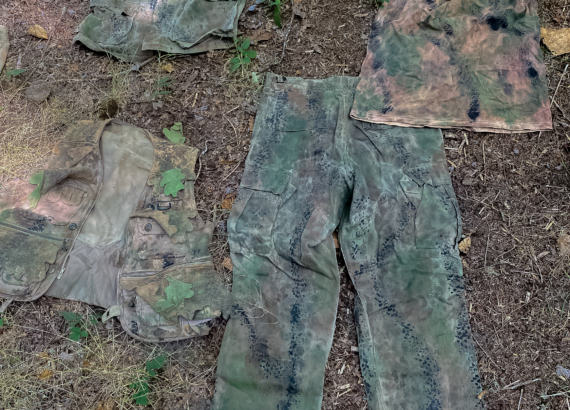
We can take things a step further by creating our own custom camo clothing. A quick trip to the arts and crafts store can supply you with many different shades and colors of dyes and paints that we can then apply to any piece of clothing that we see fit. Typically it’s good to use older garments with some wear to them as they are not as shiny as new garments. Once again, experimentation is crucial. Buy dyes and paints that mimic the earth tones in your area and start out by dying the whole garment in whatever base color you choose. Try all different methods of application. Try everything from squirt bottles to sponges cut into the shape of leaves. Use a pine cone to roll colors on. As you can see from the custom camo clothing pictures, when making your own camouflage clothing, the sky is the limit!
*Photos by Sawyer Guinn